In our last article, we looked at some ways to add trail credibility to our motocross dirt bike in the way of trail armor and fuel capacity. Now that our trail bike can ride over gnarlier terrain without splitting a case, its time to upgrade the low-end power and traction, which we plan to upgrade with a different gear ration and new tires.
Other Related Articles:
MX Trail Bike: Fuel & Armor Upgrades
MX Trail Bike: Giving a Motocross Bike New Life
Since technical trails require lower speed, having the extra low-end grunt from a dirt bike will make maneuvering around rocks, logs and tight turns a lot easier. Low-end power also improves a bikes ability to climb steep hills. One of the fastest ways to gain low-end power is to re-gear the dirt bike. This can be done by swapping out your rear sprocket, front sprocket (a.k.a. counter sprocket) or both to find the proper ratio.
SPROCKET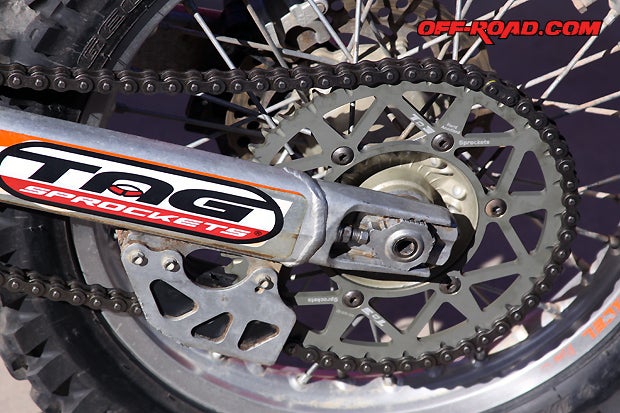
Most dirt bikes gear ratios are set up from the factory in a middle-of-the-road setting, offering good acceleration and speed. To get even faster acceleration and low-end power, just drop the number of teeth on your front sprocket or raise the number of teeth on the rear sprocket. This, of course, will reduce top speed to a certain extent, but since we will be doing more trail riding than wide-open desert riding its a better setup for our needs. The rule of thumb is that for every one tooth you drop on the front sprocket, it is equivalent to going up two teeth in the rear.
JT Sprockets offers a good table that shows the different gear ratios for different combinations. The principle is the same no matter what brand you use.

To download the full size Gear Ratio PDF visit http://www.jtsprockets.com/fileadmin/files/jtgearratio.pdf
We recently spent some time on the rocks with expert rider Jim Ryan from Utah Dual Sport. Ryan switches between riding 4-stroke and 2-stroke dirt bikes, but as of late hes been spending a lot of time on the saddle of his two-stroke-powered 300cc Gas Gas dirt bike. He told us he really likes running a 14/52 setup on his bikes; in other words, 14 teeth on the front sprocket and 52 teeth on the rear sprocket. Ryan does a lot of riding on single track trails in Moab, ranging from slick rock to dirt to red sand.

The current 14/49 combination on our KTM worked great on open desert rides, but it was lacking low-end on slow, technical trails. We definitely wanted some more low-end torque from our dirt bike, so we took Jims advice and made the jump for a taller rear sprocket. We went from a 49-tooth to 52-tooth rear sprocket.
We sourced our sprocket through a local KTM dealer who recommended we run the TAG Metals 52 rear sprocket. Here are some of the features of this off-road sprocket.
CNC Machined for precision and tight tolerances
Made of heat-treated 7075-T6 Aluminum
Hard-anodized for abrasion and corrosion resistance
Self-cleaning mud grooves extend chain life
Lightweight computer aided performance design
Weve used TAG Metals on two other 2-stroke bikes in the past and they worked great. The sprockets are made in the USA, and are a local (to us) San Diego company.
")
If lightweight aluminum isnt a priority, then metal sprockets work just as well. Some riders swear they wear better, too. JT Sprockets makes great metal sprockets if this is the route you decide to go.
 and the old 49-tooth (right) rear sprockets show a slight difference in diameter--but he added torque will be big.")
Swapping out the rear sprocket is simple. You will need to remove the wheel, then the old rear sprocket from the wheel hub. Reverse the process to get the new one on.
The only drawback to switching to a larger rear sprocket that we found is that sometimes you need to get a longer chain. In our case, we were about 3 links too short, so we had to get a 120-link chain. Overall, its a relatively simple job and the results are amazing.
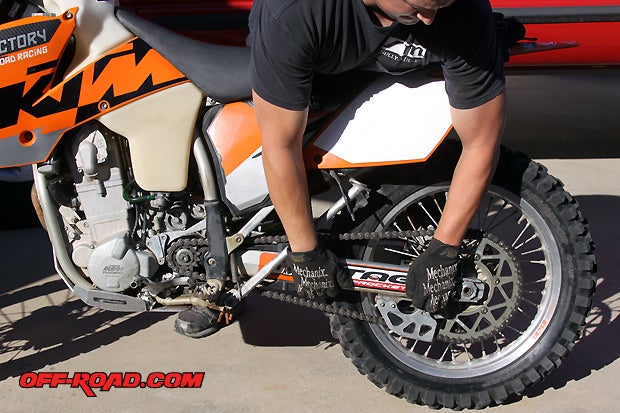
Once the sprocket and new chain are in place, some adjustment is needed to get the correct amount of tension on chain. You dont want to stretch chain slack and tighten the rear wheel while on the stand. Factor in suspension travel and changes in chain slack, as the chain gets stretched on jumps or whoops.
A quick and dirty way to check the tension on your chain can be done off the bike stand. Put your body weight over the back of the bike and then pull on the swingarm to find the tightest point for the chain. It should be where the rear axle, swingarm pivot and countershaft (front sprocket) are all in a straight line. Once you find this, you want to check for a tolerance of 1/4- to 1/2-inch of play. There are other more technical ways to do it, but this method used by race team mechanics out on the field should get you to a safe operating range.
The reason you dont want too much tension on the chain is because it can bind--causing added tension/wear on your drive components or even failure (not good).
TIRES
If you find yourself losing traction or your tire nubs are wearing down really fast after trail riding, it might be time to ditch those soft compound motocross tires for some harder compound rubber. Motocross tires tend to be on the soft side, have large voids, with plenty of hook-up for loose dirt--but these can wear down really fast on rocky terrain. If youre experiencing a mixture of hard pack, rock, and loose dirt, then a medium compound off-road dirt bike tire should do the trick. The medium compound will be labeled as off-road or enduro tires.
If youre really serious about traction on the trail, one of the latest trends is to run a trial bike rear tire. Trial bikes use tires with minimal void and medium to harder rubber compound. They work great on rocks and hard pack. They also chip and wear slower than softer motocross tires. This type of tire would excel in slick rock terrain, like Moab or Johnson Valley, Calif., at the Hammers.
")
When getting new rubber, finding the appropriate size is important. Typically, the more sidewall the better when it comes to trail riding. This will provide more cushion and tire surface to contour over rocks. Just like a 4x4, airing down is an option for additional traction, but keep in mind this will take away from performance of maneuvering fast and cornering sharp without blowing a wheel bead. Use reduced air pressure with caution.
FLYWHEEL
For some riders, squeezing out the last ounce of trail performance may come in the form of a heavier flywheel. Its an easy upgrade that will make your bike less prone to stalling on slow technical terrain. It also adds some torque to laid ow-end power and can smooth out twitchy bikes. Nobody likes a twitch!
.")
We have given you some easy-yet-powerful ideas on how to further transform your dirt bike into an awesome trail-riding machine. These upgrades can be done all at once or chipped away one area at a time. If youre doing the work yourself, one upgrade at a time might be the better option since it will give you an opportunity to see how much of a difference each trail upgrade made on your bike. You might be happy with just swapping out sprockets. Do what works for you.
Be on the lookout for more articles coming your way on transforming your old motocross dirt bike into one mean trail ride.
Other Related Articles:
MX Trail Bike: Fuel & Armor Upgrades
MX Trail Bike: Giving a Motocross Bike New Life
SOURCE:
JT Sprockets
http://www.jtsprockets.com/
Michelin Motorcycle Tires
http://michelinmotorcycle.com/
Tag Metals
http://www.sixsixone.com/tag.aspx
Trail Tech
http://trailtech.net/
|
Off-Road.com Newsletter Join our Weekly Newsletter to get the latest off-road news, reviews, events, and alerts! |
Follow @Off-Road
 Your Privacy Choices