 After tearing down the 380 top-end in our last article we were pleasantly surprised that the cylinder was in such great condition. Not bad for a KTM over nine years old already, with basically an unknown history.
If the cylinder had needed repair that would have set us back at least a month’s time waiting to get it replated and approximately $200. As it is we can probably expect to pay between $200 - $300 to rebuild the top-end with a new piston, rings, wrist-pin, wrist-pin bearing and proper o-rings/gaskets. So the fact that everything was in such great shape will save us time and money.
Another area of a used motorcycle to check thoroughly is the chassis and other attached parts. This includes things like suspension, swing-arm and steering head bearings, as well as a general inspection of the frame and swingarm for cracks or extreme wear.
Since this bike is getting close to ten years old there is a good chance that we are going to find some things in need of either repair, replacement or at a minimum servicing. The best way to inspect all of these things is to start removing parts one by one from the chassis and inspecting them, taking notes along the way of things in need of attention.
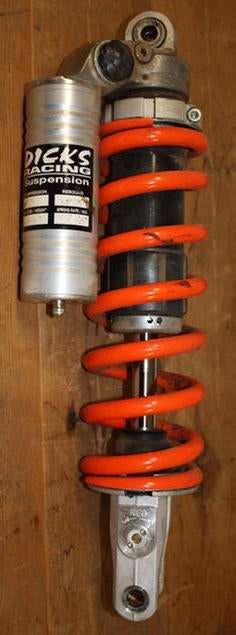
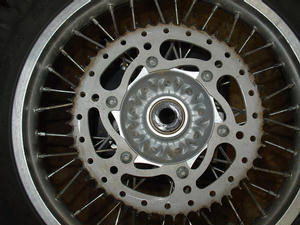
The first things to come off the 380 were the wheels and the suspension.
Often removing the rear wheel and silencer will allow the shock to come out easier. Since we had previously removed the silencer we took the rear wheel off by removing the axle nut and pulling out the axle shaft, followed by moving the chain out of the way. The shock was then removed with just two bolts, one on top that mounts to the frame and one on the bottom that mounts to the swingarm.
With the shock removed and on the bench for inspection, a quick once-over revealed no evidence of leaking or externally worn parts. In fact the receipt that came with the bike showed the shock was actually given a major overhaul in 2007, good news for us.
With the rear wheel and shock out of the way that gave us access to remove the swingarm. The swingarm is held in place by the pivot bolt that runs through the swingarm and the rear of the engine. This long shaft rests on spacers in the swingarm that ride along needle bearings. Removing this long bolt can either be a snap or can really be a struggle, depending on if it had previously been greased or just left to freeze in place over the years.
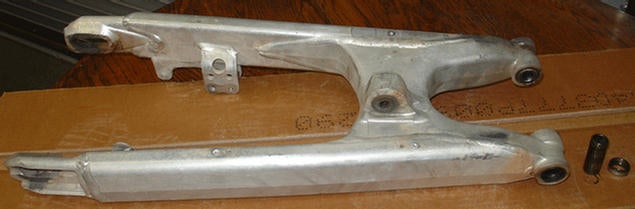
 Luckily for us at some point in the KTM's life, someone had greased the pivot shaft and after removing the nut, the shaft came right out with a few taps of a rubber mallet and socket. On top of that, removing the bushings from the swingarm revealed the bearings were also greased and appeared in good shape.
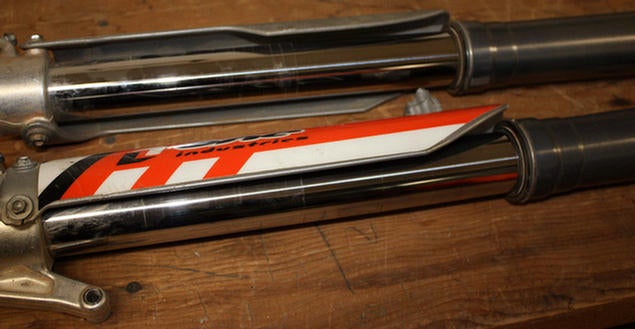
The forks were next and generally will take a little more work than the shock to remove. The bike should be secure on a stand before the front wheel is taken off - safety first. By loosening the four axle clamp bolts followed by the axle nut and then pulling the axle the front wheel should come off easlily. At this point removing the brake caliper and brake line from the left side fork is a good idea. This will allow both forks to slide right out of the triple clamps without the left fork getting caught on the brake line once the triple clamp bolts are loosened. A visual inspection of the forks showed the fork tubes to be in great shape, no leaking from the seals and all clickers in good working condition.
Read on for More...
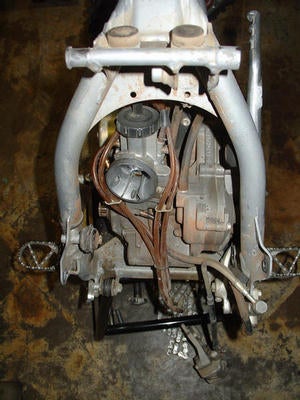 We now had the bike stripped down with basically just the engine, handlebars, triple clamps and other various smaller parts still attached to the frame. It is important on a used bike, and a new bike in many cases, to remove the triple clamps and make sure the steering head bearings are in good shape and well greased. In our case we decided to completely remove the bars and triple clamps for now and just set them aside for later.
We followed up by also disassembling the rest of the attached items on the frame like the rear brake reservoir, brake pedal, the ignition coil and black box and other small items ending up with just the engine and carb attached.
In our first test ride we checked the jetting and made some adjustments. If we hadn’t documented the jetting before, now would be a great time do so to establish a baseline. We needed to make sure the previous owner didn’t have some jetting combo that was too far off from stock. The jetting might have been say, setup leaner than stock because the previous owner was running 100% race gas. Trying to run a motor with that leaner jetting with just pump gas could end up with an engine failure, most likely due to a seized top-end. This is why checking and writing down the jetting so it can be checked against stock is such a wise idea. Also if possible ask the previous owner what type of oil and at what mixture they were using.
 Up to this point all things were pointing to the fact that we bought a used bike that is in overall great shape. Sure the chain and sprockets show signs of needing replaced, but they appeared to still be originals. And while the piston looked ready for replacement the cylinder is still in excellent shape. With mostly all positive indicators we didn’t feel we had much to worry about with the bike moving forward from this point.
To be safe, we decided to check a few more items on the engine. While these could be checked with the engine in the frame we figured we went this far so why not just remove the engine.
To remove the engine we only had to pull the two remaining engine mounts since the swingarm pivot bolt was already removed.
We also had to make sure the wires coming from the stator were not catching on a zip-ty or anything else on the frame. Those things taken into consideration the engine pulled right out and went on the workbench giving us easier access.
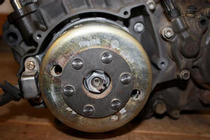 The first thing we wanted to do was to remove the ignition cover and check for rust or signs of moisture intrusion that might have caused issues with the electrical system. The first thing we wanted to do was to remove the ignition cover and check for rust or signs of moisture intrusion that might have caused issues with the electrical system. |
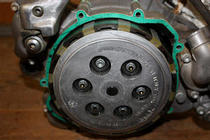 Everything looked fine, so it was on to to removing the clutch cover to search for evidence of clutch wear and abuse. Lucky again…the fingers on the clutch basket looked almost brand new with no signs of grooving whatsoever Everything looked fine, so it was on to to removing the clutch cover to search for evidence of clutch wear and abuse. Lucky again…the fingers on the clutch basket looked almost brand new with no signs of grooving whatsoever |
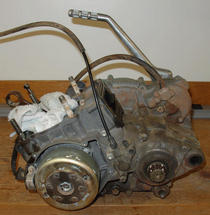 This confirmed our best case scenario that the engine was in great overall shape for its age, and most likely hadn’t been ridden too hard. This confirmed our best case scenario that the engine was in great overall shape for its age, and most likely hadn’t been ridden too hard. |
Now we know that the average person would not go to quite the extreme that we have to investigate the condition of a used motorcycle. In our case though knowing that this bike will be used for long desert rides and rides in the dunes it was in our best interest to be sure there was nothing lurking within, ready to sabotage a good riding trip. Having blown-up a dirtbike deep in the dunes before, I know that is one of the last places we want to get stuck and have to try to get towed out from. Besides, we may not be just planning on doing a simple rebuild with our Project 380 - perhaps we have much more in store!
Stay tuned and follow along in future articles to see what we are up to.
 Your Privacy Choices