Im not sure where to begin about burly bumpers. Are they for picking up a 4Runner or picking up the ladies? Improved trail extraction or jacking action? A defense against rocks and lethal greenery? A mounting point for expanded 180 degree forward lighting, a winch and proper trail armor, or a mountains answer to Wheres the beef?

In reality, our quest for a functional trail bumper was not about attractiveness, though the bumper from Addicted Off-Road certainly is nice to look at, a tiara on our junkyard princess. Addicted (AddictedOffRoad.com, 970.420.4198), a Colorado-based off-road manufacturer and fabricator, has specialized in radical off-road hardware for Toyotas for more than a decade (and has expanded its product line since moving to Colorado a few years ago).

This particular project, the 4Tundra trail rig (for lack of a better name), is about making a good 4Runner trail-worthy with a lot of junkyard Tundra parts, and without blowing the bank. Its fitting, then, that such an attractive bumper is also useful and inexpensive.
50/50 Tube/Plate Bumper Is 100% Functional
Addicteds front bumper is a useful tube-plate hybrid, and it can be installed in a day by anyone with solid fabrication skills (and in only an hour by someone who does it for a living). Theres no chopping necessary for its installation; in fact, just some unbolting, a little grinding, a few moments with the B.F.H. to duplicate the super-snug fit that Addicted recommends (and some welding if you want to use a winch).

Our Addicted bumper arrived with the necessary bolts (six of them, as big as your thumb), replacements LED blinkers, and a substantial bolt or weld-on sub-bumper that boxes the leading ends of your 4Runner/Tacoma/Tundra/FJ frame-rails, and in turn receiving the tube bumper itself. The main bumper is therefore connected to the frame through that sub-bumper, which in turn reinforces the frame, and thanks to those ridiculously large bolts, you can jack from anywhere on the bumper.

Your author should take pains to add that this bumper was in his possession for six months before being installed. This is to illustrate that there are steps, more than a few, that need to be coordinated to make the installation go, or youll spend copious time waiting for one thing to unlimber the opportunity for another. Once you decide on your bumper (which Addicteds highly visual website makes a very easy), the rather large item needs to be shipped in a rather slow boat Upon arrival, theres a lot of raw metal around, so its time to get any additional fabricating done, such as light tabs or a whip mount. Addicted can install those tabs and set up the bumper for a body lift if you specify it upon ordering. Then you need to coat the bumper, after which youll disassemble the front end, mount, align and attach the sub-bumper in one series of processes that can be lumped together.
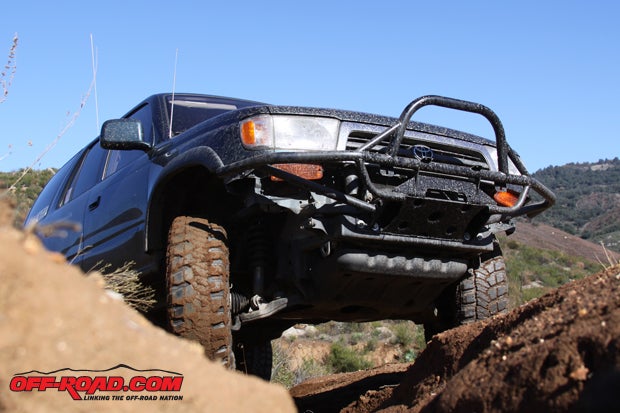
.jpg "The fit between sub-bumper and frame is tight four-pounder tight. Its a good thing, so long as you get the sub-bumper all the way on.")
Choosing the Right Bumper
The first step to getting this bumper going was to choose one. Its easy to see a nice fabbed truck bumper online, then another and another, and lose track of which one you liked and why. Truck bumpers generally run either the trail/rock style of welded plate steel in boxed arrangements, with some tubing incorporated for details or extensions, and the all-tube style thats much lighter but not as robust. The all-tube bumpers usually appear in pre-runner arrangements on desert-based trucks. The trail-style boxed bumpers are supposed to be stout, but they weigh more because of it. Thats an anathema to the lightweight sand and dune types, thus the minimalist full-tube pre-runner style. The Addicted bumper, meanwhile, is a smart combination of both.

Addicted Off-Roads trail-tube bumper is constructed from both plate and tube steel, using a structure of press-bent, cold-rolled plate steel to make a strong central core that incorporates the frame and winch mounts (1/2-inch thick on the sides, 1/4-inch thick under the winch plate). Lateral 1.75-inch .120 wall HREW steel tubing sweeps back and outward to the corners from that center section. The boxed plate core means strength, but it adds less weight than if the whole bumper were made with it (and does a killer job of mating the bumper to the frame). The tubing makes things as light as possible, though the size used (1.75-inch OD) is strong enough that a Hi-Lift or bottle jack can be used at any point on the bumper. The boxed center section also has large ports cut for D-rings in the 1/2-inch plate buttresses. The design is marginally modular, available with or without the stinger. The whole look is a dichotomy of Scotty himself, founder and owner of Addicted Off-Road, who spent a lot of time in Southern California building trucks amongst the pre-runners before moving to Colorado to expand Addicted Off-Road.

Coating and Rust-Proofing
We let Chris Reaves at Powder 1 in El Cajon, Calif., powder-coat this sexy thing (619.588.9200). Any worthwhile powder-coater like Powder 1 will be prepared to take care of other important steps like sand-blasting, so the minor surface corrosion that formed while the bumper awaited its turn in the oven was no issue. You might be tempted to spray-bomb the whole thing, but even superior rust and funk-penetrating rattle-can coatings prefer to adhere to metal that isnt infected with rust and atmospheric crudulation.

Because the sub-bumper the part that attaches to the frame itself requires metal to be hammered (getting the tight-fitting sub-bumper in place), ground and welded, you cant put a pretty powder-coat on it without grinding it back off to weld. This is unfortunate, but like I said, theres plenty of good rattle-can coatings that can be applied to the sub-bumper, which are much easier to be welded through and then reapplied. Because the main bumper assembly must be used while aligning the sub-bumper prior to attaching it to the frame, we figured wed do all the prep, then do all the fab. Powder1 coated the Addicted bumper, we rattle-canned the sub-bumper, and the night before assembling everything, we peeled off the OEM bumper on the 4Runner to prepare the front end for fabrication. The OEM 4Runner bumper comes off in typical Toyota fashion, simple and straightforward. To install the sub-bumper, youll need to strip the bumper to the frame tips, including removing the little impact-redirector frame fangs. Theres about 10 bolts for the bumper itself, plus indicator wiring and a few peripheral lower bumper brackets and the metal ears that support them.
, you can see a minor bit of cutting that was necessary to clear the A/C condenser line. This has been addressed up in the newest version of the sub-bumper.")
Bumpers and Sub-Bumpers and Bolts and Welding
With the exposed front end, its time for your fab guy to fab. Use someone whose been around a welder and built things of metal (good things), and be sure to depend on their instincts. The bare frame ends have small ears that must be ground off theyre perfectly obvious, and to fit the Addicted sub-bumper there cant be any of those ears left and a slight taper doesnt hurt. The sub-bumper, bent from 1/4-inch thick plate, is shaped to cap the frame ends tightly, so tightly that a four-pound BFH will help seat the sub-bumper squarely. Youd be advised to be thorough with your force, as this is a tight fit indeed. Check clearance with the AC condenser line that hangs down very near the sub-bumper. You can double-check that the sub-bumper is fully seated through several ports in the sides of the sub-bumper. The same holes will provide good opening to rosette the sub-bumper on the frame ends, but you arent be ready to weld yet its time to grab the tube-bumper and test alignment.
, you can finish coating it all with a nice matte black. Note the brackets underneath the corner markers these will be removed and the plastic nearby will be trimmed.")
Getting the main bumper to hang straight is straightforward (hah). Once the sub-bumper is in place, attach the main bumper finger-tight, supporting it so its weight wont move the as yet unwelded sub-bumper. From there, youll want to align the bumper in the exact position itll ride on the truck for the rest of its life check the winch plate for level relative to the truck, the ends of the bumper for how they line up with the corners, and dead-eye the bumper facing the truck to make sure it lines up with the face of the truck. Once everything keys up, tack-weld the sub-bumper in place and remove the main bumper so you can attach the sub completely.

The welding is up to the fab guy. Dont tell a welder how to weld unless you want him (or her) to let you do it, which is the reason you went to them in the first place. We were blessed to have our Addicted bumper fitted by San Diego-based Mark Fageol, master fabricator/welder/machinist and scion of the Fageol truck company. He also builds twin-screw superchargers for Harleys from scratch. While your fab guys is fabbing, its not a bad idea to put a battery isolator on, just to make sure you dont fry your stereo and other useful things like the ECU. Once the sub-bumpers welded up, apply more of the rust-preventative coating to any exposed metal.
 behind the forward radiator support. We made a cute little shield to keep them there out of freshly trimmed well liner.")
With the sub-bumper in place, theres not much left to do. One man can one-arm the main bumper its not that heavy and thread the thumb-sized monster bolts into place. You want to tighten them to tight. We checked with Scotty at Addicted and he stated that theres not an exact torque figure, and that a strong tug with a breaker bar should be enough. We used a set of big-ass washers (thats a technical term, folks) so we could put a little more leverage to the bolts, and a little bit of thread lock compound goes a long way to keep those bolts there.

Minor details? A set of killer LED signal indicators are available with the Addicted bumper, and were going to install them on the built-in mounting tangs, but before we have time to pick up some good OEM waterproof connectors (junkyard!) and route the wiring, we zip-tied the extant OEM units up under the headlights to keep things legal. Weve got more plans for this Addicted bumper, including wiring it up for big PIAA forward lighting, some lateral LED lighting and those sweet little LED blinkers that came with the bumper, a winch and a decent flag mount, plus a partial OEM Tacoma bumper cut down to fit behind the Addicted trail bumper.


|
Off-Road.com Newsletter Join our Weekly Newsletter to get the latest off-road news, reviews, events, and alerts! |
Follow @Off-Road
 Your Privacy Choices